PHP实现图片合并的示例详解
业务需求
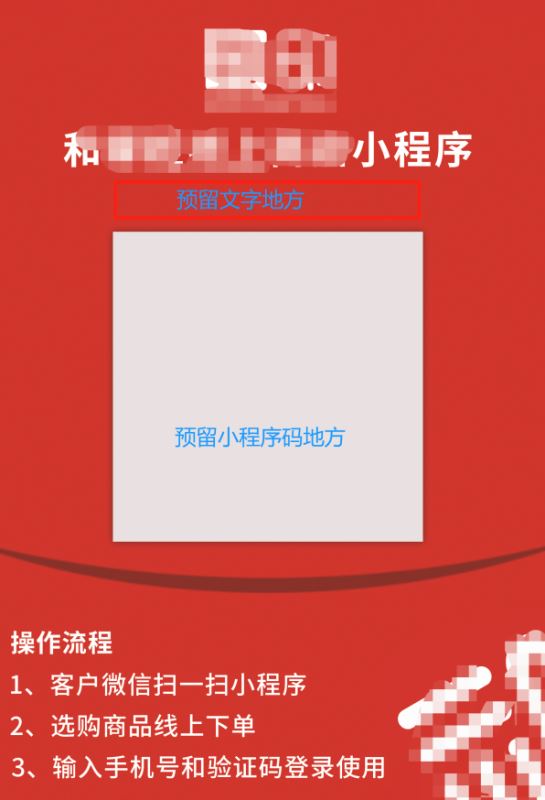
我们需要一个微信小程序码,但是是需要提供给别人扫码的但是只有一个纯粹的小程序码是不好看的,所以需要推广的海报图片。再结合文字


最终效果

准备工作
1、需要海报的底图
2、小程序码的图片
代码部分结合YII2但不影响使用
完整过程
第一步:生成小程序码图片
第二步:缩放小程序码的图片大小 (如果尺寸符合海报大小可省略) 280-1280px
第三步:将缩放后的小程序图片合成到背景图片
第四步:合成文字信息
第一步:生成小程序码图片 (我使用的场景是无限制小程序码code地址 三种自行选择)
//微信小程序 小程序码 public static function getWeChatSmallProgramCode($scene) { $AccessToken = self::getAccessToken(); $url = "https://api.weixin.qq.com/wxa/getwxacodeunlimit?access_token=" . $AccessToken; $postData = [ 'scene' => $scene, 'page' => 'pages/index/index', 'width'=>930 ]; $postData = json_encode($postData); $contentData = self::sendPost($url, $postData); return $contentData; //如果图片大小符合这开启base64位图片地址也可以完成图片的合并合文字的合并// return self::base64UrlCode($contentData, 'image/png'); } protected static function sendPost($url, $post_data) { $options = array( 'http' => array( 'method' => 'POST', 'header' => 'Content-type:application/json', //header 需要设置为 JSON 'content' => $post_data, 'timeout' => 60 //超时时间 ) ); $context = stream_context_create($options); return file_get_contents($url, false, $context); } //二进制转图片image/png public static function base64UrlCode($contents, $mime) { $base64 = base64_encode($contents); return ('data:' . $mime . ';base64,' . $base64); }第二步:缩放小程序码的图片大小
/** * 缩放图片尺寸 * @param $img_path string 图片地址 * @param $new_width * @param $new_height * @param $new_img_path string 新的图片地址 */ public static function picZoom($img_path,$new_width,$new_height,$new_img_path) { //获取尺寸 list($width, $height, $img_type, $attr) = getimagesize($img_path); $imageinfo = [ 'width' => $width, 'height' => $height, 'type' => image_type_to_extension($img_type, false), 'attr' => $attr ]; $fun = "imagecreatefrom" . $imageinfo['type']; $image = $fun($img_path); //创建新的幕布 $image_thump = imagecreatetruecolor($new_width, $new_height); //复制源文件 imagecopyresampled($image_thump, $image, 0, 0, 0, 0, $new_width, $new_height, $imageinfo['width'], $imageinfo['height']); imagedestroy($image); $image = $image_thump; $func = 'image' . $imageinfo['type']; $func($image, $new_img_path); }第三步:将缩放后的小程序图片合成到背景图片
/** * 图片合并 * 将源图片覆盖到目标图片上 * @param string $dstPath 目标图片路径 背景图 * @param string $srcPath 源图片路径 内容图 * @param int $dstX 源图片覆盖到目标的X轴坐标 * @param int $dstY 源图片覆盖到目标的Y轴坐标 * @param int $srcX * @param int $srcY * @param int $pct 透明度 * @param string $filename 输出的文件名,为空则直接在浏览器上输出显示 * @return string $filename 合并后的文件名 */ public static function picMerge($dstPath, $srcPath, $dstX = 0, $dstY = 0, $srcX = 0, $srcY = 0, $pct = 100, $filename = '') { //创建图片的实例 $dst = imagecreatefromstring(file_get_contents($dstPath)); $src = imagecreatefromstring(file_get_contents($srcPath)); //获取水印图片的宽高 list($src_w, $src_h) = getimagesize($srcPath); //将水印图片复制到目标图片上,最后个参数50是设置透明度,这里实现半透明效果// imagecopymerge($dst, $src, 80, 125, 0, 0, $src_w, $src_h, 100); imagecopymerge($dst, $src, $dstX, $dstY, $srcX, $srcY, $src_w, $src_h, $pct); //如果水印图片本身带透明色,则使用imagecopy方法 //imagecopy($dst, $src, 10, 10, 0, 0, $src_w, $src_h); //输出图片 list($dst_w, $dst_h, $dst_type) = getimagesize($dstPath); switch ($dst_type) { case 1://GIF if (!$filename) { header('Content-Type: image/gif'); imagegif($dst); } else { imagegif($dst, $filename); } break; case 2://JPG if (!$filename) { header('Content-Type: image/jpeg'); imagejpeg($dst); } else { imagejpeg($dst, $filename); } break; case 3://PNG if (!$filename) { header('Content-Type: image/png'); imagepng($dst); } else { imagepng($dst, $filename); } break; default: break; } imagedestroy($dst); imagedestroy($src); }第四步:合成文字信息
/** * 添加文字到图片上 * @param $dstPath string 目标图片 * @param $fontPath string 字体路径 * @param $fontSize string 字体大小 * @param $text string 文字内容 * @param $dstY string 文字Y坐标值 * @param string $filename 输出文件名,为空则在浏览器上直接输出显示 * @return string 返回文件名 */ public static function addFontToPic($dstPath, $fontPath, $fontSize, $text, $dstY, $filename = '') { ob_end_clean(); //创建图片的实例 $dst = imagecreatefromstring(file_get_contents($dstPath)); //打上文字 $fontColor = imagecolorallocate($dst, 255, 255, 255);//字体颜色 $width = imagesx($dst); $height = imagesy($dst); $fontBox = imagettfbbox($fontSize, 0, $fontPath, $text);//文字水平居中实质 imagettftext($dst, $fontSize, 0, ceil(($width - $fontBox[2]) / 2), $dstY, $fontColor, $fontPath, $text); //输出图片 list($dst_w, $dst_h, $dst_type) = getimagesize($dstPath); switch ($dst_type) { case 1://GIF if (!$filename) { header('Content-Type: image/gif'); imagegif($dst); } else { imagegif($dst, $filename); } break; case 2://JPG if (!$filename) { header('Content-Type: image/jpeg'); imagejpeg($dst); } else { imagejpeg($dst, $filename); } break; case 3://PNG if (!$filename) { header('Content-Type: image/png'); imagepng($dst); } else { imagepng($dst, $filename); } break; default: break; } imagedestroy($dst); return $filename; }外部的调用
/** * 根据店铺id 和名称 合成A5 图片小程序图片 * @param $shop_id * @param $shop_name * @return array */ public static function generateWeChatAppletImage($shop_id, $shop_name) { //1 生成小程序码 //2 合成小程序码到背景图片 $sceneStr = '?shop_id=' . $shop_id; $weChatAppImgBaseData = WxTools::getWeChatSmallProgramCode($sceneStr); $weChatAppImgPath = './weChatAppImg/shop_code_' . $shop_id . '.jpg'; file_put_contents($weChatAppImgPath, $weChatAppImgBaseData); //合并到背景图片中 $beiJinImgPath = './weChatAppImg/weChatBJ.jpg'; $mergeImgFile = './weChatAppImg/shop_mini_program' . $shop_id . '.jpg'; GenerateCodeImg::picMerge($beiJinImgPath, $weChatAppImgPath, 408, 714, $srcX = 0, $srcY = 0, $pct = 100, $mergeImgFile); //3 合成文字 $fontPath = './plus/fonts/SourceHanSansCN-Bold.ttf'; $fontSize = 40; $dstY = 640; GenerateCodeImg::addFontToPic($mergeImgFile, $fontPath, $fontSize, $shop_name, $dstY, $mergeImgFile); $weChatCodeImgUrL = \Yii::$app->request->hostInfo . '/weChatAppImg/shop_code_' . $shop_id . '.jpg'; $weChatAppImgUrl = \Yii::$app->request->hostInfo . '/weChatAppImg/shop_mini_program' . $shop_id . '.jpg'; return [ 'weChatCodeImgUrL' => $weChatCodeImgUrL, 'weChatAppImgUrl' => $weChatAppImgUrl, ]; }常见的问题
1文字合并的时候出现乱码?
第一检测一下字体是否是正常tff字体 如果不知道去C://windows/Fonts 随便找一个 微软雅黑都行
2、英文阿拉布数字正常 中文乱码
$text = mb_convert_encoding("呵呵呵","UTF-8","GBK");
$text = mb_convert_encoding("呵呵呵","html-entities","UTF-8");
设置看看
到此这篇关于PHP实现图片合并的示例详解的文章就介绍到这了,更多相关PHP图片合并内容请搜索以前的文章或继续浏览下面的相关文章希望大家以后多多支持!
